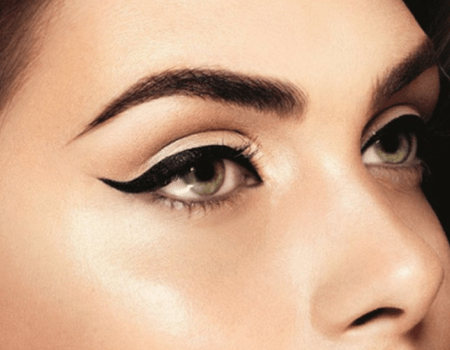
Thick Eyebrows Microblading: How Modern Techniques Prevent Harsh Brows
Ever seen thick brows that look sharp, flat, or stamped on, and thought, “I want fuller brows, but not that”? You are not alone. Most people want brows that look dense yet believable, like real hair grows there. The good news is modern artists now build fullness with softer strokes, smarter mapping, and better pigment control. When an artist matches technique to your skin and face, thick brows stop looking heavy and start looking like you just got lucky with genetics.
Why Thick Eyebrows Microblading Used to Look Harsh
Older results often looked harsh for a few practical reasons, not because “thick brows” were the problem.
- Too much pressure, too deep: Deep cuts and heavy passes made strokes heal thicker than planned. That turns crisp hair strokes into wider marks.
- Flat colour choices: When pigment ran too dark or too warm, brows looked solid instead of layered.
- Copy-paste brow shapes: Some artists reused the same arch and front start on every face. That creates a blocky look fast.
- No skin-type strategy: Oily skin, mature skin, and sensitive skin behave differently during healing and retention.
- Rushed density: Many harsh results came from trying to “finish” density in one sitting.
One data point shows how mainstream this became. In a cross-sectional study of 705 adults, 17.4% had undergone eyebrow microblading, mainly for cosmetic reasons, and about 65% knew about microblading before doing it.
How Modern Thick Eyebrows Microblading Creates Soft, Natural Results
Today’s approach focuses on control and layering, not intensity.
- Artists build density in stages
They start with a believable base pattern, then add fullness during a touch-up once the skin settles. This avoids the “too much, too soon” problem. - Strokes follow real growth, not a template
Modern mapping uses natural direction changes:
- upward strokes near the front
- angled strokes through the body
- tapered tails that stay light and clean
This is where the eyebrow hair stroke technique matters. When direction looks right, the brow reads as hair even when it looks fuller.
- Soft starts replace harsh fronts
A gentle fade at the brow head keeps the face open. It prevents that squared-off, marker look. - Pigment selection gets smarter
Artists now treat pigment like foundation. They consider undertone, hair colour, and how pigment heals on your skin. This supports eyebrow shape enhancement without turning the brow into a flat patch.
Advanced Techniques Used for Thick Eyebrows Microblading Today
Modern artists mix methods to keep fullness realistic.
Hair-Stroke Density Mapping
Instead of packing strokes everywhere, artists place strokes where your brow needs support:
- gaps in the front
- thinning through the arch
- uneven tail density
That approach supports eyebrow density correction while keeping negative space, which helps realism.
Layered Tones for Depth
Using a slightly lighter tone in the front and a deeper tone throughout the body adds dimension. This supports microblading for fuller eyebrows without a heavy finish.
Precision Tapering
Tapered stroke ends keep the brow looking like hair. Thick strokes with blunt ends heal harshly.
Symmetry Balancing, Not Symmetry Forcing
A strong artist aims for “matched sisters,” not identical twins. They adjust height, tail length, and arch points for eyebrow symmetry microblading while still respecting facial expression.
Hybrid Approaches When Needed
Some clients do better with a blend of strokes and soft shading. This can help clients who want bold brow microblading without that solid “filled-in” look.
Skin Type Factors That Change Brow Results
If someone wants a fuller look, skin type often decides the safest path.
- Oily skin: Skin oils can soften strokes faster. Many artists use lighter density up front and plan a controlled build at touch-up.
- Mature skin: Thinner, delicate skin needs a gentler approach. Light pressure and careful spacing keep strokes clean.
- Sensitive skin: Sensitivity does not mean “no,” but it does mean careful prep, patch-history review, and conservative density.
- Dry skin: Dry skin often holds crisp strokes well, but aftercare still matters, or scabbing can pull pigment.
If you want natural, thick brows microblading, skin strategy matters as much as shape.
Powder Brows vs Microblading for Full Brows
Both methods can look soft. The right pick depends on your skin, your makeup style, and how you want “full” to read in daylight.
| Factor | Microblading (hair strokes. | Powder/Ombré (soft shading. |
| Best for | Hair-like texture, natural finish | Makeup-like softness, even tone |
| Oily skin | Can blur sooner | Often holds better |
| Mature skin | Works with light pressure, spaced strokes | Can look softer with gentle shading |
| “Very full” look | Built gradually for realism | Easier to create uniform fullness |
| Healing look | Starts bold, then softens | More even, still lightens over time |
Clients chasing dense eyebrow microblading sometimes assume strokes alone will do everything. In reality, the best “thick but natural” results often come from choosing the method that matches the skin.
Aftercare Habits That Help Brows Heal Softly
Aftercare decides whether the healed result looks airy or muddy.
- Keep it clean, keep it calm: Clean hands, clean pillowcase, and no picking.
- Avoid heavy moisture: Too much ointment can cause pigment spread and blur. Use only the amount your artist advises.
- Skip sweat and steam early: Heat and sweat can push irritation and slow healing.
- Protect from the sun: UV can shift pigment and increase fading.
- Expect a cycle: Brows look darker early, then flake, then appear lighter, then settle. That is normal.
If you want thick brow microblading results that still look soft, treat healing like part of the procedure, not an afterthought.
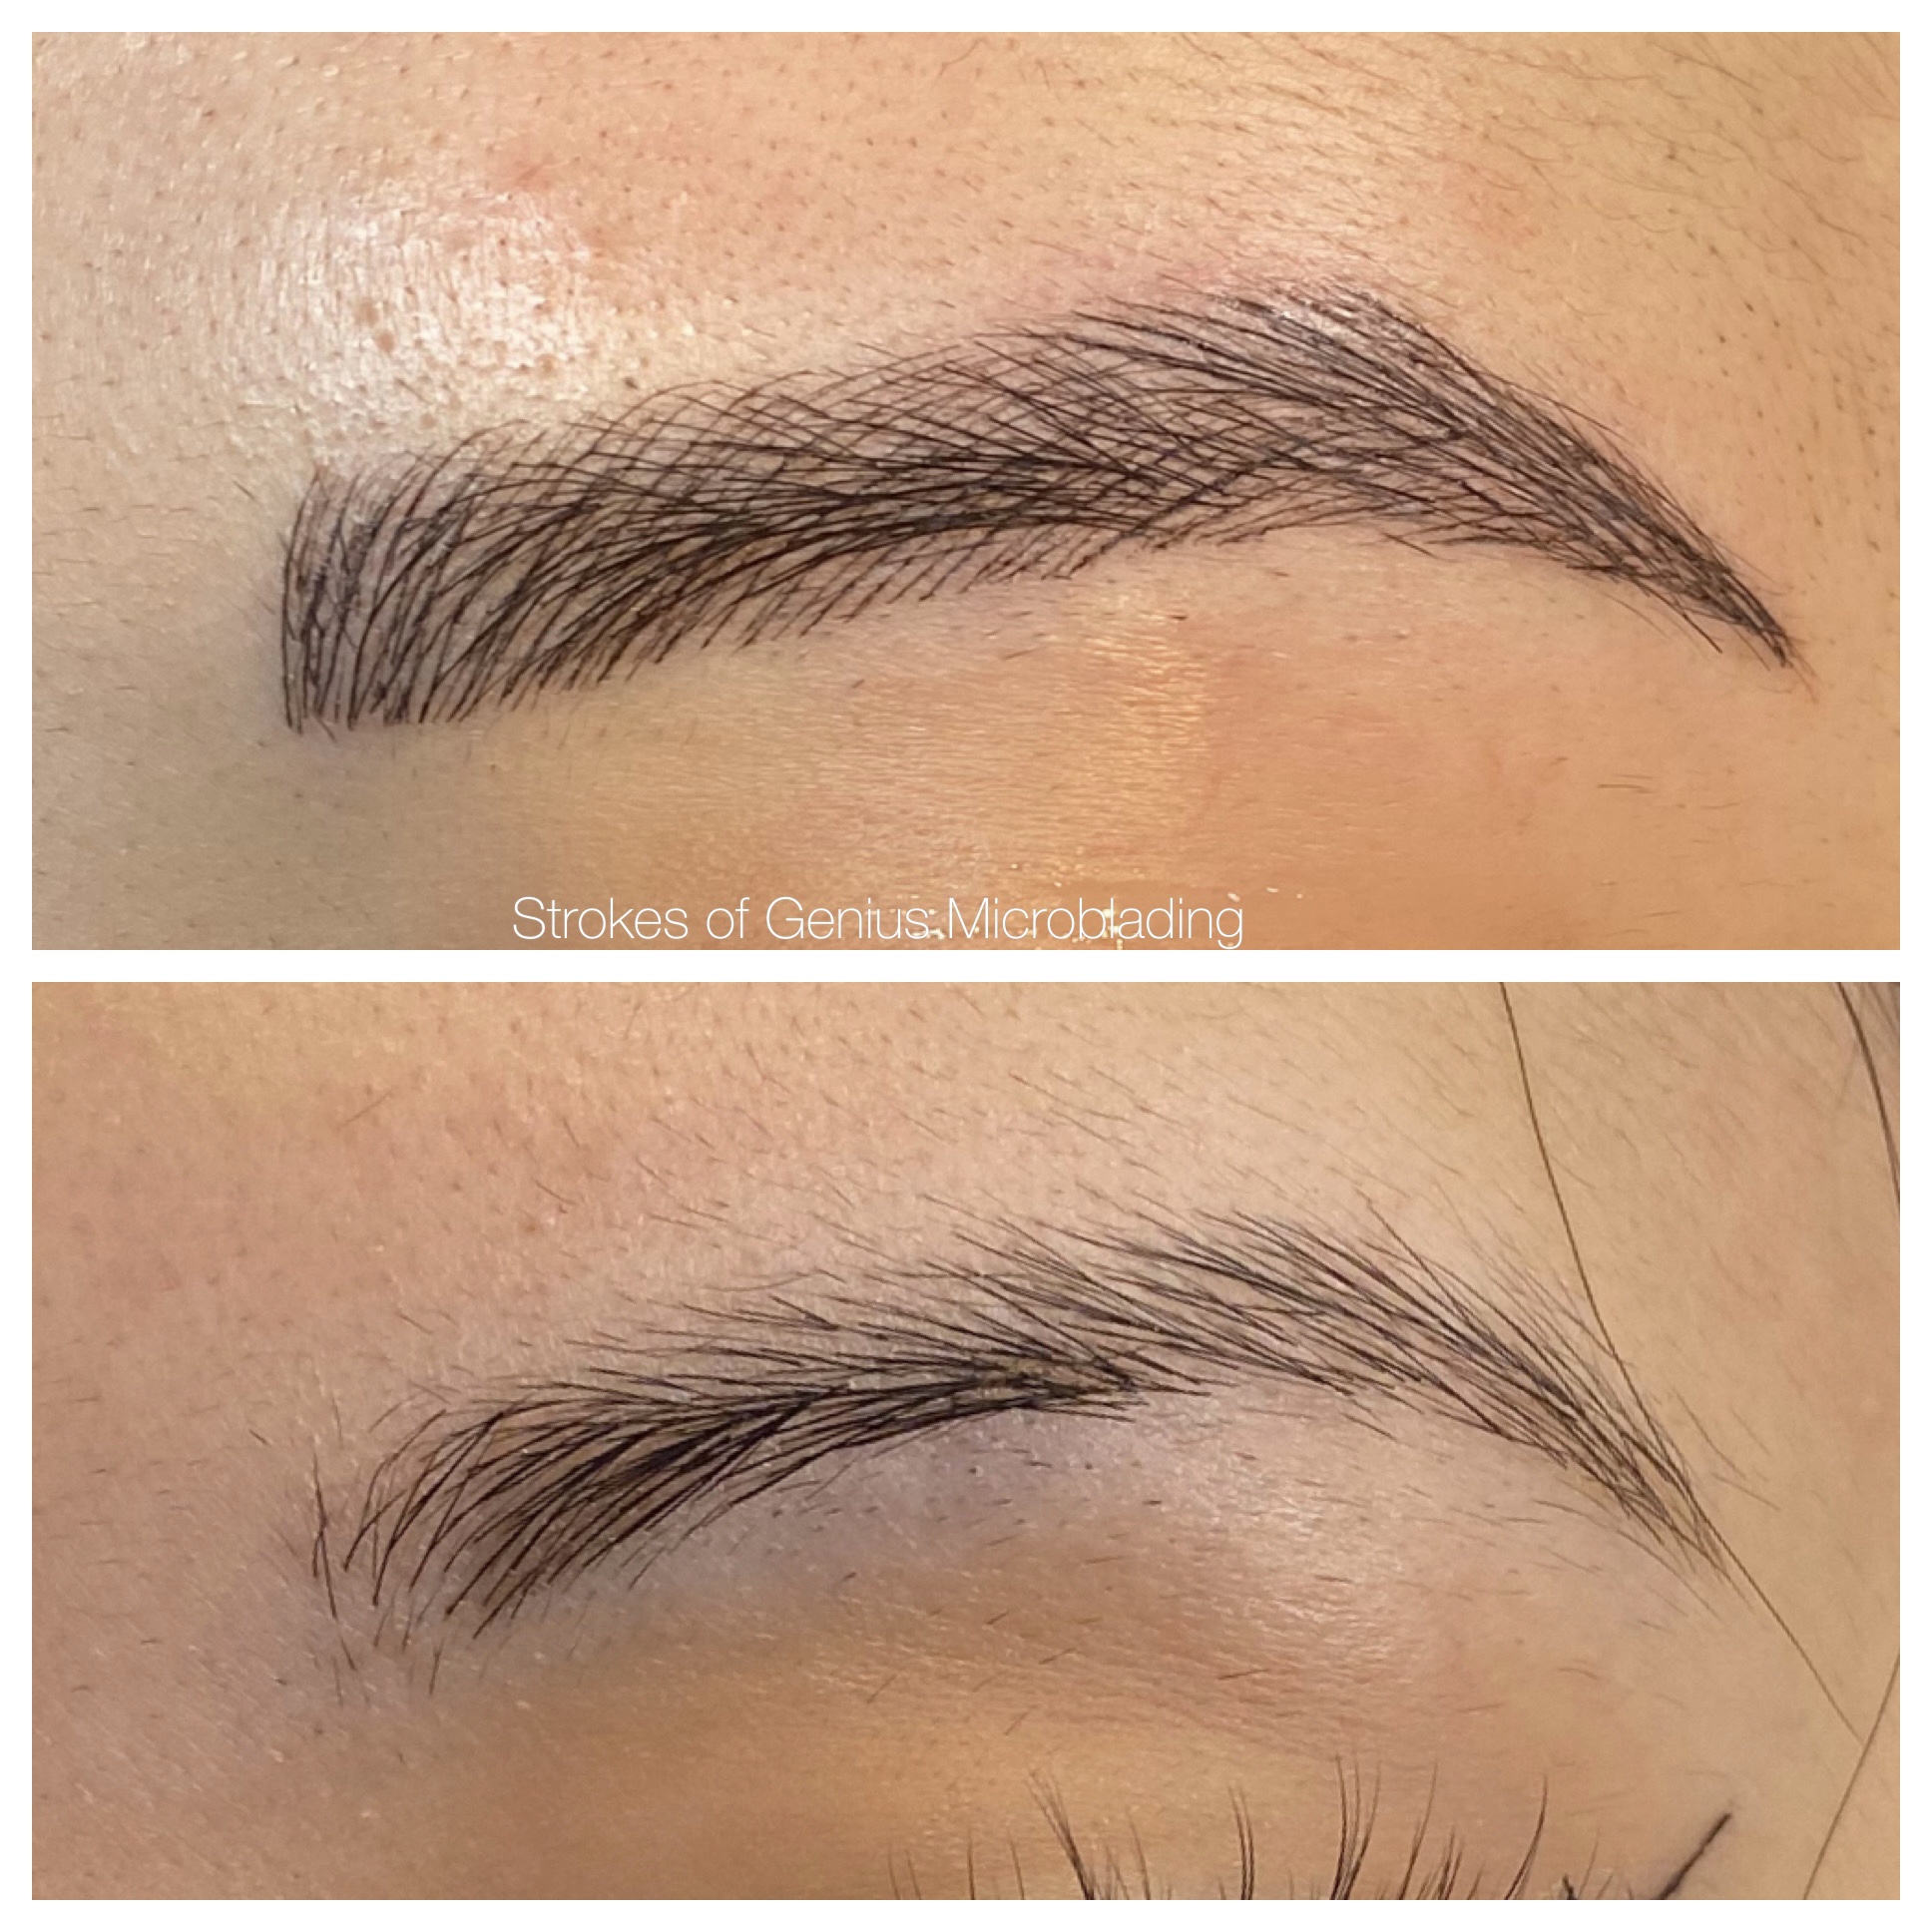
How Strokes of Genius Microblading Creates Thick Brows That Last Long
We create thick, natural-looking brows that last by mixing solid technique with a design that suits your face, skin, and daily routine. We start by mapping your ideal shape and choosing a pigment that matches your natural tones, then we build fullness with fine, hair-like strokes. The result is brows that look naturally dense, not drawn on, and they stay that way because we focus on both precision and proper healing.
- We begin with brow mapping and shape planning so thickness, arch, and length look balanced on your face.
- We use realistic microblading strokes to mimic natural hairs and layer them where you need more density.
- We match and blend pigment shades so the healed color looks natural and stays flattering over time.
- We adjust our technique for your skin type, including oily, dry, mature, or sensitive skin, so retention is better and healing is smoother.
- We guide you through aftercare step by step so the strokes settle well and last longer.
- We include a touch-up session to refine any light areas and lock in the final thickness and shape.
Final Thoughts
Modern technique fixes the harsh-brow problem when the artist controls depth, direction, and density, then lets the skin do its job during healing. If you want a fuller look that still reads like real hair in daylight, you need a plan that starts soft and builds the right way. At Strokes of Genius Microblading, we map brows to your features, choose pigment for your undertone, and build thickness with restraint so results stay natural, not blocky.
If you’re ready to stop filling your brows every morning, book a consultation with us and get a shape that suits your face and heals clean. Thick eyebrows microblading works best when it looks effortless.
FAQs
1. Can you still wear brow makeup after microblading?
Yes, but wait until the skin fully heals and your artist clears you. Apply makeup around the brows first, then use light brow products only if needed. Heavy products can make brows look dense too fast.
2. What should you ask at a consultation to avoid blocky brows?
Ask to see healed photos, not fresh work. Ask how they map brow fronts, how they adjust for your skin type, and how they plan density over two sessions. Those answers reveal control and restraint.
3. What happens if you already have a semi-permanent eyebrow tattoo underneath?
Many artists can work over old pigment, but they must evaluate colour, saturation, and placement first. Some cases need lightning or removal before new strokes. A serious consult prevents messy layering.
4. How do you choose the right pigment tone for a full brow look?
A skilled artist matches pigment to undertone, hair colour, and your natural brow depth. They avoid going too warm or too dark on day one. A balanced tone sounds softer and looks more natural.
5. Do thicker brows need more touch-ups than normal brows?
Not always. Touch-ups depend on skin type, aftercare, sun exposure, and technique. Many fuller looks last well when artists build density gradually, and clients protect brows from UV and over-exfoliation.
Why Certified Eyebrow Microblading Services Deliver Better, Safer Results
Ever look in the mirror and wonder why your brows seem different in every photo, even when your routine never changes? That moment is usually what pushes people to explore eyebrow microblading services. But the real question is not whether microblading looks good. It is who should do it and under what standards.
When skin, pigment, and blades are involved, training stops being optional. It becomes the line between clean, balanced brows and months of correction. Choose what reduces irritation, lowers risk, and holds up over time.
Safety Standards Behind Certified Eyebrow Microblading Services
Microblading breaks the skin. That single fact should shape every decision you make. Certified work typically follows safety steps that protect both the skin barrier and the final result.
What safer practice looks like in real life
- Sterile setup and single-use tools: A trained studio controls contamination risk through proper sanitation, disposable blades, and clean handling.
- Skin assessment before pigment: A certified microblading artist checks skin type, oiliness, sensitivity, and past reactions before choosing a method.
- Patch-test mindset: Not every studio runs formal patch tests for every client, but certified artists tend to take allergy risks seriously and document client history.
- Pigment standards: People often ask for “FDA-approved microblading pigments.” In practice, you want reputable pigment brands, traceable batches, and professional storage and handling.
One note from the field: At Strokes of Genius Microblading, we start with clear consultation steps and focus on controlled, hygienic workflow so clients do not feel rushed or confused mid-service.
Technical Skill Advantages of Certified Eyebrow Microblading Services
Microblading is not “drawing brows.” It is a technique that requires consistent depth control, stroke direction, and pigment placement that suits how skin heals.
Where training directly changes outcomes
- Depth and pressure control: Too shallow fades fast. Too deep scars or blurs. Trained eyebrow microblading specialists learn to keep the stroke inside the correct skin layer.
- Mapping and symmetry: Professional eyebrow microblading starts with facial mapping that respects your bone structure, eye spacing, and natural brow growth.
- Pigment selection: Certified microblading technicians match undertones and skin behaviour. That matters because warm, cool, and neutral choices heal differently.
- Stroke strategy: Realistic hair-stroke microblading relies on spacing, tapering, and consistent stroke flow. Beginners often stack strokes too tightly, which heals heavy.
A cross-sectional study published on ResearchGate reported that 17.4% of surveyed adults had undergone eyebrow microblading, which signals this service has moved beyond niche demand and into mainstream decision-making. That also increases the need for regulated, trained service quality.
Look for a trained eyebrow microblading specialist who reduces variables: clean tools, documented steps, stable technique, and clear aftercare.
Certified vs Non-Certified Eyebrow Microblading Services
This is where many clients get practical. They want a quick way to compare. Use this table to scan the real difference.
| Factor | Certified eyebrow microblading services | Non-certified services |
| Training | Accredited courses, supervised practice, skill checks | Self-taught or informal practice |
| Safety protocols | Hygienic microblading procedures, sterile workflow | Inconsistent hygiene and setup |
| Tools | Sterile microblading tools, single-use blades | Tool handling varies by operator |
| Technique | Precision eyebrow microblading with depth control | Uneven pressure, inconsistent depth |
| Results | Natural-looking eyebrow microblading that heals cleaner | Higher chance of blurred or patchy healing |
| Accountability | Documented process and aftercare guidance | Limited documentation and follow-up |
| Long-term value | Fewer corrections, better retention | Higher risk of costly fixes |
Long-Term Results and Maintenance
Microblading does not end when you leave the chair. Healing and retention define whether the work looks refined or messy months later.
What certified technique improves long-term
- Even fading: Good technique fades gradually rather than turning patchy.
- Cleaner lines over time: Proper depth reduces blurred strokes.
- Smarter touch-up planning: Licensed eyebrow microblading services usually set realistic touch-up timelines. You avoid “too soon” touch-ups that overload the skin.
If you want long-lasting microblading results, treat upkeep like skincare. Follow the aftercare, protect your brows, and book touch-ups only when your skin is fully ready.
Common Risks When Choosing Uncertified Eyebrow Microblading Services
Uncertified work often fails in predictable ways. Most issues come from poor depth, weak hygiene, or unclear aftercare.
Common problems clients report
- Overworked skin: Too many passes create trauma that heals unevenly.
- Blurry strokes: Deep cuts cause pigment to spread.
- Colour shifts: Poor pigment selection or improper handling leads to odd tones.
- Infection risk: Bad sanitation practices raise the risk of complications.
- No plan for fix: The hardest part is the lack of structured correction options.
This is why many people search for “best certified eyebrow microblading services” or “professional brow microblading near me.” They want fewer surprises.
How to Identify Certified Eyebrow Microblading Services Before Booking
Treat this like hiring a specialist, not buying a one-time beauty service.
Ask these questions
- Are you a certified microblading artist or certified microblading technician? Where did you train?
- Do you use sterile, single-use supplies and follow certified safety protocols?
- How do you adjust technique for oily, mature, or sensitive skin?
- What aftercare do you give, and how do you support clients while the brows heal?
- Can I see healed results, not just fresh work?
Portfolio tip: Fresh photos look impressive. Healed results prove skill.
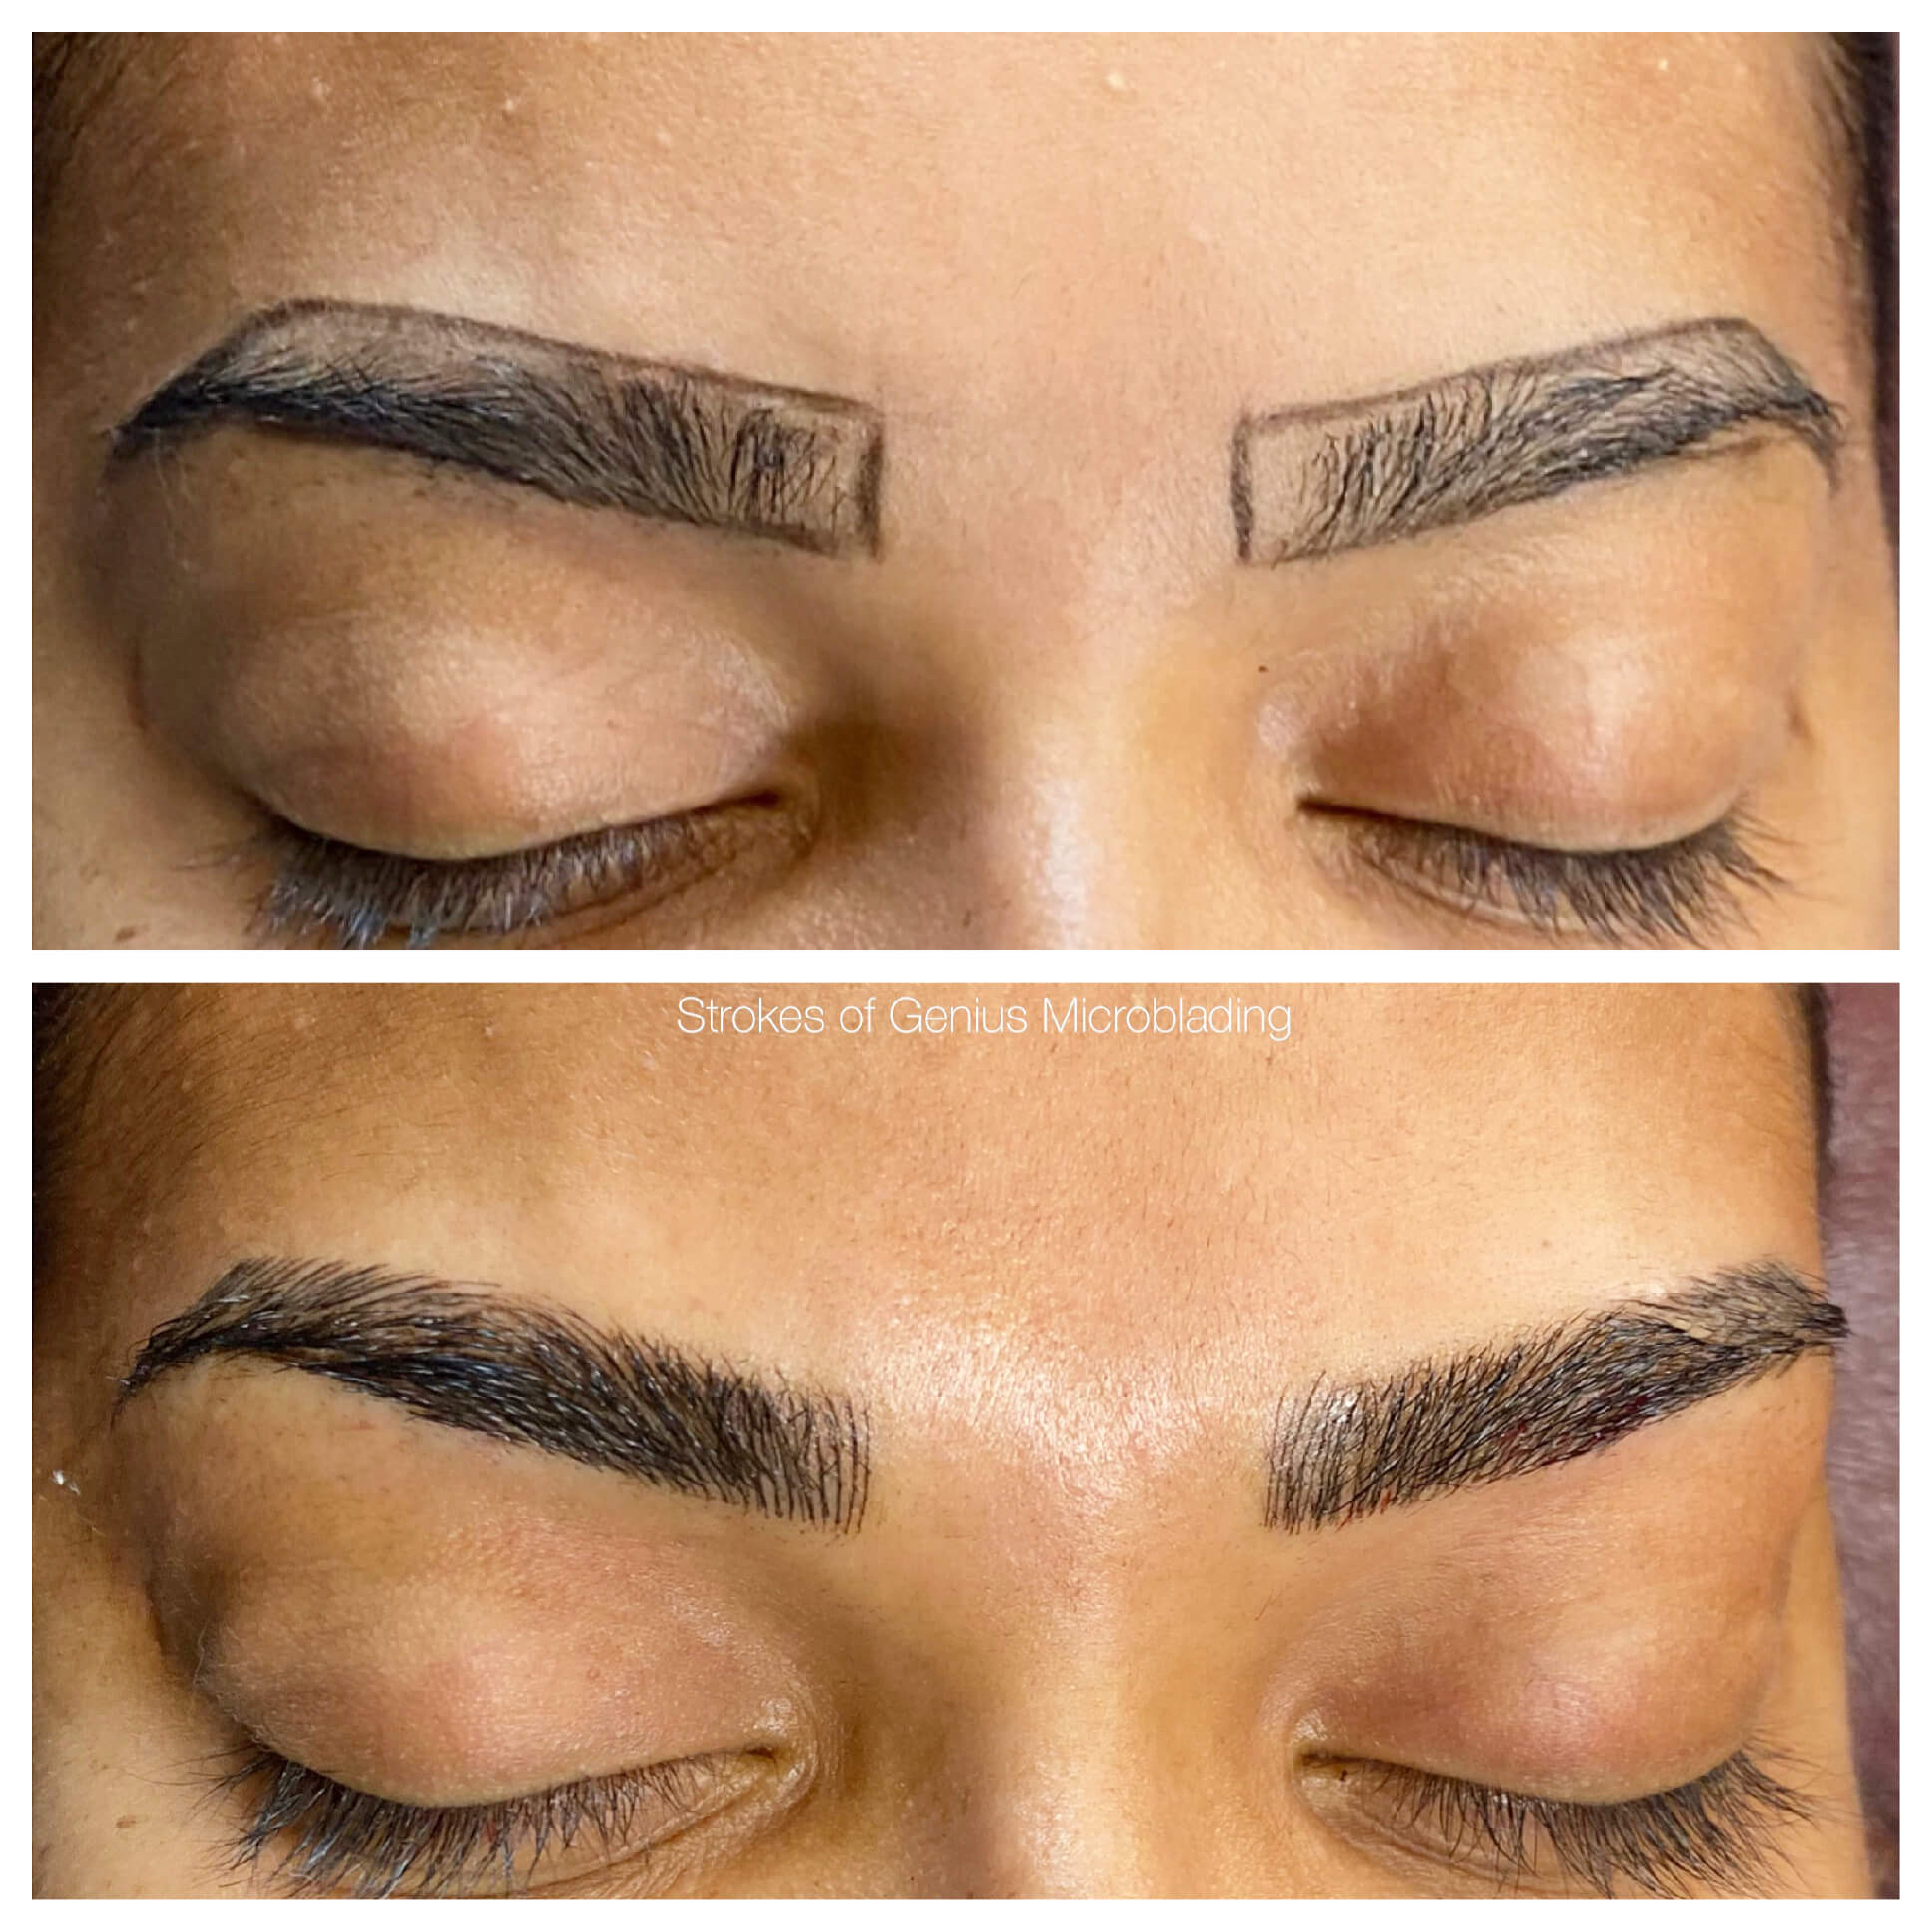
How Strokes of Genius Microblading Helps Clients Get Safer, Better Brows
We help clients get safer, better brows by keeping the process clean, careful, and fully personalized. We do not rush. We take time to understand what you want, check what your skin can handle, and create brows that suit your face. That is how we deliver results that look great and feel safe from the first appointment through healing.
- We start with a proper consultation so we can understand your brow goals, your routine, and any skin concerns before we begin.
- We map and measure your brows to match your features, so they look balanced and natural from both sides.
- We choose pigment shades that suit your skin tone and hair, so healed brows look soft and realistic, not too dark or odd.
- We use a gentle, controlled technique to create crisp hair-like strokes without overworking the skin.
- We explain aftercare in a simple way, so you know exactly what to do and what to avoid while healing.
- We schedule a touch-up to refine shape and fill any lighter areas, so the final brows look even and last longer.
This supports clients who want good brows and a lower irritation risk across their beauty routine.
Final Thoughts
Certified eyebrow microblading services protect your skin, your look, and your budget. They bring trained technique, hygiene discipline, and aftercare structure into a service that needs all three. If you want brows that heal clean and look natural, book with a studio that treats safety as part of the art.
If you want a team that respects sensitive clients and still delivers precision, connect with us at Strokes of Genius Microblading today and ask about your personalized brow plan, plus comfort-forward guidance that fits your routine.
FAQs
1. Does microblading hurt more on oily skin?
Oily skin can feel more sensitive during the process and may heal faster, which can reduce pigment retention. A trained technician adjusts technique and expectations for oily skin.
2. Can I get microblading if I use retinol or chemical exfoliants?
Many artists ask you to pause strong activities before and after the appointment because they speed up skin turnover. Bring your product list to the consult so the artist can guide timing.
3. What is the difference between microblading and nano brows?
Microblading uses a manual blade. Nano brows usually use a machine with a fine needle. Many artists recommend nano for oily or mature skin due to better retention.
4. How do I know if my microblading is healing normally?
Normal healing usually shows mild redness early, light flaking, and temporary fading before the colour settles. Seek medical help if you notice unusual swelling, heat, or discharge.
5. Can microblading change colour over time?
Yes, pigment can shift with skin chemistry, sun exposure, and pigment choice. Certified artists reduce this risk with correct pigment matching and clear aftercare guidance.
Microblading Aftercare Orlando: Keep Your Brows Stunning Without the Stress
Have you ever checked the mirror after microblading and felt a sense of panic as you saw your brows were darker, you saw some scabbing begin, or you thought you had flakes on the pillow? You are not alone. Orlando has many women who are enamored with the thought of having full and natural brows and are terrified of healing failures that would leave them awake at night. What if the color fades too fast? What if the brows look patchy? What if aftercare mistakes ruin the whole investment? This is exactly where Microblading Aftercare Orlando becomes the difference between brows that last and brows that disappoint.
Why Aftercare Makes or Breaks Your Brow Results
Microblading is not just about the artist’s skill. It is a process. The pigment sits on your skin, and your skin reacts. Without proper aftercare, the pigment breaks down faster, scabs tear open, and you book corrections sooner than you should.
At Strokes of Genius Microblading, clients are reminded that aftercare is half the job. The most perfect brows on day one will be no help when they are not taken care of. The truth is plain and simple: the better you treat your brows during the first few weeks, the longer they remain in form and colour. That is why understanding the dos and don’ts is as significant as selecting the appropriate artist in Orlando.
The Common Fears About Microblading Healing
When people walk into the studio, they often share the same doubts. Will it hurt to keep brows dry for a week? What happens when brows scab? Can makeup hide the awkward stage? These questions are real, and ignoring them makes clients anxious.
Healing has stages. First, brows may look bold and dark. Then peeling begins. Later, the color looks faded or patchy before pigment resurfaces and settles. This rollercoaster can scare anyone but is a normal part of microblading. The good news is that Microblading Aftercare Orlando routines are designed to guide you through each step without panic.
Microblading Healing Stages in Orlando
Understanding how brows heal keeps you calm. Here’s what usually happens:
- Days 1–3: Brows look bold, sometimes too bold. This is pigment oxidation.
- Days 4–7: Scabbing, flaking, and dryness. The urge to scratch starts.
- Days 8–14: Brows look faded or patchy. Clients often worry that the pigment is gone.
- Weeks 3–6: Color begins to settle, soft and natural.
- At touch-up: Shape is perfected and gaps are fixed.
Knowing this cycle helps clients trust the process. At Strokes of Genius Microblading, every client is educated before leaving the studio, so surprises are minimized.
Orlando Aftercare Instructions You Should Never Skip
Proper aftercare is a routine, not a suggestion. Here is what every client in Orlando is asked to follow:
- Keep brows completely dry for the first 7–10 days.
- Avoid swimming, saunas, steam, and heavy workouts.
- Do not pick or scratch flakes. Let them fall naturally.
- No makeup, lotions, soaps, or skincare products on brows until healed.
- Protect from sun exposure with a hat or SPF after day 10.
These rules may sound strict, but they save your brows. Every skipped step risks pigment loss or uneven healing.
What to Avoid for Best Healing
Clients often make mistakes without realizing it. Some think a quick swim will not hurt. Others dab on concealer to hide scabs. But these small actions cost you weeks of results. Here’s what you should stay away from:
- Tanning beds and direct sunlight in the first month
- Retinol, acids, or strong exfoliants around brows
- Excessive sweating from gyms or hot yoga
- Sleeping face down on your pillow
- Rubbing brows with towels or tissues
Healing brows need protection, not experiments. A little discipline now means long-lasting brows later.
Breaking Down Healing by Timeline (with Table)
To simplify aftercare, here’s a timeline for Orlando clients of Strokes of Genius Microblading.
| Timeline | What You See | What You Must Do |
| Days 1–3 | Brows look darker than expected | Keep them dry, no touching |
| Days 4–7 | Scabbing and flaking start | Do not scratch, avoid makeup |
| Days 8–14 | Brows look faded and patchy | Stay patient, pigment resurfaces |
| Weeks 3–6 | Color softens and sets | Protect from the sun, keep skin moisturized |
| After 6 weeks | Brows look natural | Attend a touch-up session |
This step-by-step guide removes confusion. Instead of panicking, you know exactly what to expect.
Why Orlando Clients Struggle with Aftercare
Florida heat makes aftercare harder. Sweat, humidity, and outdoor lifestyles increase risks. Many clients in Orlando struggle with staying dry during healing. This is why Strokes of Genius Microblading emphasizes preparation. Clients are advised to book sessions when they can avoid pools, workouts, or beach trips for at least two weeks. Planning matters as much as aftercare itself.
Myths About Microblading Aftercare
There are endless myths in beauty forums. Some say coconut oil speeds up healing. Others claim you must wash your brows daily. The truth is simple: over-care ruins brows faster than under-care. Pigment needs stillness, not experiments. Trusting your Orlando artist’s advice is safer than copying random online tips.
The Role of Touch-ups in Long-Lasting Brows
Even with perfect aftercare, brows need a touch-up. First sessions always fade a little because the skin pushes out pigment. Touch-ups correct this and seal the results. For Orlando clients, touch-ups are usually scheduled 6–8 weeks after the first session. Annual touch-ups are recommended to keep brows fresh and counter natural fading from sun exposure, which is common in Florida.
Why Choose Strokes of Genius for Aftercare Support
Many studios hand clients a paper and send them away. At Strokes of Genius Microblading, clients receive detailed written and verbal instructions, plus reminders that brows should stay dry, protected from the sun, and handled with care during every stage. The goal is not just beautiful brows on day one but brows that stay consistent for years. Clients from Orlando, Windermere, Winter Garden, Ocoee, Davenport, and Kissimmee trust the studio.”
FAQs on Microblading Aftercare Orlando
- Can I wash my face after microblading?
Yes, but avoid the brow area completely. Use a damp cloth around brows until healed.
- What if my brows start itching?
Itching is normal. Do not scratch. Pat gently if needed, but let flakes fall naturally.
- How long before I can wear makeup again?
Usually two weeks. But always confirm with your artist at your follow-up.
- Do brows really look patchy during healing?
Yes, it is part of the process. Pigment resurfaces after peeling, so patience is key.
Conclusion: Protect Your Investment with the Right Aftercare
Microblading is an investment in yourself. But without proper healing, the money and time spent can fade fast. If you want brows that last, trust the experts who combine skill with aftercare education. At Strokes of Genius Microblading, clients get more than service; they get guidance for life-proof brows.
Book your appointment today and let your journey to perfect brows in Orlando begin. Remember, Microblading Aftercare Orlando is not just about rules. It is about protecting your beauty.

Microblading Pre Treatment Advice FL Checklist For Flawless Brows
Have you ever looked in the mirror, tired of filling in your brows every morning, only to wonder if microblading is the right fix? Then the doubts creep in. What if it fades too quickly? What if I don’t prepare right? Will it hurt more than it should? These are the questions every woman in Florida asks before leaping.
The secret to flawless brows doesn’t just sit in the artist’s hands; it begins with you. How you prepare before walking into the studio sets the tone for the results. At Strokes of Genius Microblading, we’ve seen women transform their brows and confidence. And here’s the thing: proper prep ensures you enjoy long-lasting, natural results without stress. That’s why today, we’re breaking down everything you need to know about Microblading Pre Treatment Advice FL, so your session feels smooth, your healing is easier, and your brows stay beautiful.
Why Preparing Matters More Than You Think
The majority believes that microblading is just a matter of turning up and having the procedure done. But that’s not how it works. Your skin is your canvas; it must be prepared as any artwork. The pigment won’t settle as it should if your skin is oily, inflamed, or full of products. That leads to patchy strokes or faster fading. Many clients also don’t realize that lifestyle habits, like drinking, smoking, or even working out right before, can mess with results.
At Strokes of Genius Microblading, we always say this: the better you prep, the better your brows look. You don’t want to pay for a retouch sooner than needed. And you don’t want to sit through extra discomfort. The preparation tips we share with you are built on years of experience in Florida’s climate, where humidity and skin type also play a role. Following the right
Microblading Pre Treatment Advice FL keeps your brows looking fresh for months.
Steps to Take One Week Before Your Appointment
One week out is where the prep truly starts. This is when you should focus on setting your skin in the best condition.
- Skip facial treatments – No waxing, threading, peels, or Botox at least seven days before. Your skin needs time to recover.
- Limit sun exposure – Sunburned skin is irritated skin. It can’t take pigment well.
- Ease off skincare acids – Retinol, glycolic, and vitamin C can make skin thin and sensitive. Stop them a week before.
- Stay hydrated – Drinking water improves your skin’s elasticity, making it easier to work with.
Every step here is about giving your artist a smooth canvas. Ignoring them can lead to brows that don’t heal evenly.
What To Avoid The Day Before
The day before microblading, your habits matter as much as the day before. Think of it like a big event. You wouldn’t eat the wrong food before a race. The same logic applies here.
- No alcohol or caffeine. Both thin your blood, which can cause more bleeding during the session. That means less pigment retention.
- Don’t take painkillers unless prescribed. Aspirin and ibuprofen thin the blood. Acetaminophen is usually safer if you need relief.
- Rest well. A calm body makes the procedure smoother, and you’ll sit more comfortably through mapping, numbing, and microblading
- Don’t exercise heavily. Sweating before your appointment makes your skin open and harder to work with.
Clients often ignore this, but when brows don’t heal well, it almost always goes back to skipped prep steps. Following Microblading Pre Treatment Advice FL ensures you won’t waste your time or money.
Day Of The Appointment: How To Show Up Right
This is the big day. You’re nervous, maybe excited, but the right choices now make the whole process smoother.
- Come with a clean face. Do not wear makeup or brow products. Do not put heavy lotions or oils on the skin around the brows.
- Eat a balanced meal. You feel lightheaded because you are hungry throughout the session.
- Wear comfortable clothes. Microblading is time-consuming, so you would like to be relaxed.
- Check in 15 minutes early to do paperwork. Rushing only adds stress.
At Strokes of Genius Microblading, numbing is applied twice before and during your session to keep you as comfortable as possible. But if you come in anxious, your body naturally fights the process. A calm state means less pain and better results.
Breaking Down What To Do and What To Avoid
Here’s a simple breakdown to keep it clear:
| Do This Before Your Session | Avoid This Before Your Session |
| Drink water daily | Alcohol and caffeine |
| Stop retinol & acids | Painkillers like aspirin |
| Protect from the sun | Heavy exercise |
| Sleep well | Botox, peels, or facials |
| Eat before the appointment | Arriving with makeup on |
This chart is the quick checklist many of our clients in Florida follow. Stick to it, and you’ll walk in confident, knowing you’ve set yourself up for success.
What Happens If You Don’t Prepare
Here’s the blunt truth: ignoring Microblading Pre Treatment Advice FL costs you results. Your brows might fade in patches, the pigment might not hold, and you could even experience more pain during the session because your skin isn’t ready. In the worst case, you pay for more sessions to fix what could have been avoided.
Preparation is the difference between brows that heal evenly and last longer, versus brows that fade too soon or need extra touch-ups. At Strokes of Genius Microblading, we see preparation as part of the artistry. You don’t microblade unprepared skin like you wouldn’t paint on a dirty canvas.
How Preparation Connects To Long-Term Results
Good prep doesn’t just impact the appointment. It also shapes the months ahead. When clients do as they are instructed, the life of their brows is usually prolonged. In some cases, the touch-up they need after six weeks is postponed, or they only have to be corrected after a shorter period. Calm, moist, and prepared skin is a better carrier of pigment. It also heals with fewer scabs. That means your brows look even and sharp, not patchy.
In Florida’s humid climate, where sweat and sun play a big role, prep becomes even more important. The environment is tough on brows. Pre-treatment steps act as protection, helping you fight against early fading.
Conclusion: Ready For Your Brow Transformation?
Brows are more than just hair. They frame your face, shape your expression, and boost your confidence. But perfect brows don’t happen by chance. They happen when you pair the right artist with the right preparation. Following Microblading Pre Treatment Advice FL means your brows heal beautifully and stay stunning longer.
If you’re ready to wake up every morning with brows that look naturally full, it’s time to book with Strokes of Genius Microblading. Schedule your consultation today, follow the prep steps, and enter your appointment knowing you’re ready. Let’s shape brows that truly belong to you.
Everything You Need to Know About Natural Permanent Eyeliner in USA
Have you ever stood in front of the mirror, hands shaking, trying to draw the perfect eyeliner line before rushing out the door? Maybe the left side looks good, but the right one refuses to match. Or maybe your eyeliner smudges halfway through the day, leaving you frustrated before an important meeting or dinner. You know the struggle doubles if you wear contact lenses or struggle with watery eyes. This daily battle is why so many women turn to natural permanent eyeliner. It’s not just makeup. It’s freedom from one of the most annoying steps in your beauty routine.
At Strokes of Genius Microblading, clients walk in tired of the smudges and walk out with a solution that saves time, lasts for years, and looks fresh even when life gets hectic.
What Exactly Is Natural Permanent Eyeliner
Natural permanent eyeliner is a cosmetic tattoo that enhances your lash line with soft, pigment-based strokes. Unlike traditional tattoos, this method uses specialized tools and pigments designed for the delicate eye area. The goal is not a dramatic line, unless you ask for it. It’s a subtle definition that looks clean and natural.
Instead of reapplying eyeliner every morning, the pigment is implanted along the lash line. Think of it as waking up already looking put together. For busy professionals, moms juggling kids, or women who wear makeup daily, it’s like gaining back minutes of peace every day.
At Strokes of Genius Microblading, the approach is less about flashy lines and more about enhancing your features. Clients often describe the final look as polished but never overdone.
Why Women Prefer It Over Traditional Makeup
Convenience is the obvious reason. But there’s more behind the shift toward natural permanent eyeliner. Here’s why the demand keeps growing across the USA:
- Time saver – You don’t waste ten minutes each morning trying to get both eyes even.
- Smudge-free – Sweat, rain, gym sessions, or even tears can’t ruin it.
- Safe for sensitive eyes – Perfect for people with allergies or contact lenses.
- Lasts longer – Properly done, results can stay for one to three years.
When you think about it, that’s not just saving minutes in your day. That’s hundreds of hours where you never had to fight with a liquid liner again.
Comparing Styles of Eyeliner Options
When people hear “permanent eyeliner,” many imagine harsh tattoo lines. There are multiple ways to design the look, and not every client wants the same finish.
|
Style Type |
Look Achieved | Best For |
|
Lash Enhancement |
Pigment placed close to lashes, soft and natural |
Every day subtle definition |
|
Classic Eyeliner |
Thin, clean line above lashes |
Clients who like a regular eyeliner look |
|
Winged or Designer |
Slight extension or wing effect |
Bolder style seekers |
| Lower Lash Line Option | Pigment under the eye |
Clients who wear liner daily on both lids |
At Strokes of Genius Microblading, the lash enhancement version is the most popular. It gives that “I woke up ready” effect without screaming makeup.
Preparation and What to Expect
Many women worry about pain or downtime. The reality is much simpler. Trained artists use numbing agents, and while you may feel mild pressure, most clients describe it as more ticklish than painful.
Before your appointment, avoid caffeine, alcohol, and blood thinners. If you have eyelash extensions, they must be removed at least eight weeks before the permanent eyeliner session to protect your lash line. On the day, arrive makeup-free and relaxed.
The procedure can take one to two hours, depending on the style. You’ll leave with pigment looking stronger than the final healed result. Within a week, the color softens and looks more natural.
Healing and Aftercare
Healing is straightforward but must be followed carefully. In the first week, the pigment may appear darker. Some swelling is normal. Keeping the area dry and clean is the rule. No picking at scabs, no heavy workouts that cause sweat, and no makeup around the area until it heals.
Most clients notice the pigment softening within 7 to 10 days and the eyeliner appearing more natural. A follow-up session is usually scheduled around 6 to 8 weeks later, which helps refine and perfect the eyeliner.
For long-lasting results, sunscreen use is recommended. Touch-ups every couple of years keep the pigment fresh.
Longevity and Realistic Expectations
A big question is: how long does natural permanent eyeliner last? Results typically last 1 to 3 years, though touch-ups are recommended to maintain a fresh look over time. Someone who spends hours in the sun may need earlier touch-ups than someone who works indoors.
Think of it as semi-permanent. It’s not forever, but it lasts long enough to change how you live your daily routine.
Why Strokes of Genius Microblading Stands Out
Plenty of places in Orlando and nearby Florida areas advertise permanent eyeliner. Still, the difference comes down to expertise and safety. Strokes of Genius Microblading has earned over 300 five-star reviews, making it one of Orlando’s top-rated permanent makeup studios.
Clients mention professionalism, attention to comfort, and the welcoming atmosphere. The studio also guides every client before and after, so there’s no confusion about what to expect.
In beauty treatments near the eyes, skill is everything. This is not a service where you want shortcuts. By choosing an experienced artist like Neena at Strokes of Genius Microblading, you remove the worry and focus on the benefits.
Addressing Common Concerns
- Does it hurt? Most say it feels more like pressure, thanks to numbing cream.
- Can I wear makeup afterward? Once healed, yes, you can still add makeup on top.
- Will it fade to a strange color? With high-quality pigments, it fades naturally and softly.
- What if I change my style? Since it’s not permanent forever, you can adjust or refresh at touch-ups.
Why Natural Is the Future of Beauty
The shift toward natural permanent eyeliner is part of a bigger movement in beauty. Women want enhancements that look effortless, not fake. They want low-maintenance routines that still make them feel confident.
This service hits the sweet spot. It doesn’t scream makeup; it whispers definition. You look like yourself, just a bit sharper, fresher, and more polished.
Conclusion: Time to Rethink Your Routine
How much time have you wasted fighting with eyeliner pencils, gels, and liquids? How many mornings did you wish you could skip that step? With natural permanent eyeliner, you can.
If you’re in the USA and ready to stop stressing over smudges, Strokes of Genius Microblading is where you start. Book your consultation today and step into a routine where your eyes are always defined, no matter what the day throws at you.
Save Time and Stay Polished with Permanent Eyeliner Orlando FL
Every morning feels like a race against the clock. You’ve got coffee brewing, emails piling up, and somehow you’re still standing in front of the mirror trying to steady your hand for that perfect eyeliner stroke. When you finally step out, one side looks uneven, or worse, the Florida heat has already started melting it away. For women juggling work, family, and a busy lifestyle, makeup shouldn’t feel like another chore.
That’s exactly why more women are turning to permanent eyeliner Orlando FL. It gives you the sharp, smudge-proof definition you want, without stealing minutes from your morning routine. At Strokes of Genius Microblading, it’s not about heavy makeup. It’s about waking up with eyes that look polished and confident; no mirror battles are required.
The Rise of Long-Lasting Eyeliner Solutions
Permanent eyeliner Orlando FL has been in high demand in the market. Women are sick of the fuss and need something easy to use in their routine. The makeup process must not be time-consuming, but rather be able to bring out your beauty.
Safe pigments are implanted along the eyelash line into a permanent eyeliner. The outcome is very natural, long-lasting, and subtle. Unlike other makeup pencils that cannot withstand the Florida heat and have to melt, this solution remains sharp no matter the season.
Many clients also choose this treatment because of sensitive eyes. Traditional eyeliners often contain ingredients that trigger allergies or irritation. With permanent eyeliner, you skip that problem completely.
Breaking Down How the Process Works
If you’re new to this, permanent makeup might sound scary. But it’s far more comfortable and precise than people assume. This is what it can be expected that the experience will be like when booking an appointment at Strokes of Genius Microblading:
- Consultation: Neena, a personal consultation. She checks your eye shape, personal style, and lifestyle.
- Design – A draft of your eyeliner look is drawn so you can visualize it before applying pigment.
- Procedure: The pigment is carefully implanted using sterile equipment and topical numbing. Right after, it looks bold, but within a week, it fades and settles into a softer, natural tone.
- Healing – At first, the pigment looks bold. Within a week, it softens into a more natural finish.
- Touch-up – Around 6 weeks later, a touch-up is done for perfect color saturation.
It’s a precise process, and the results are designed to look natural. There are
no heavy, harsh lines, just a soft enhancement that frames the eyes beautifully.
Comparing Traditional Eyeliner with Permanent Eyeliner
Here’s a simple comparison of what women usually notice when they switch from daily eyeliner pencils to permanent eyeliner Orlando FL:
| Feature | Traditional Eyeliner | Permanent Eyeliner |
| Time Spent | 10–15 mins daily | Zero after procedure |
| Durability | Smudges, melts | Lasts for years |
| Skin/Eye Reaction | Can irritate | Safe for sensitive eyes |
| Maintenance | Needs re-application daily | Only occasional touch-up |
| Waterproofing | Rarely survives sweat | Always waterproof |
This is why so many women in Orlando are choosing the permanent route. It’s not just makeup. It’s freedom from the morning stress and the constant touch-ups.
Why Strokes of Genius Microblading Stands Out
You’ll find many salons talking about permanent eyeliner. But Strokes of Genius Microblading sets itself apart for a few key reasons:
- Experience and Training: Neena, the founder, has multiple certifications in microblading, eyeliner, and lip blush. She also holds a Florida Department of Health tattoo license and advanced training in pigment safety.
- Focus on Natural Results: The goal isn’t to give you a heavy makeup look. It’s to make your eyes look naturally defined. Clients describe it as “waking up with perfect lashes every day.”
- Clean and Safe Environment: Everything is handled with medical precision, from sterile tools to strict sanitation practices.
- Reputation: The studio has built a trusted reputation across Orlando and nearby areas like Winter Garden, Kissimmee, and Windermere, with consistently glowing reviews.
Women want more than pigment on their skin. They want to feel safe, understood, and confident when they leave the chair. That’s exactly what this studio provides.
What the Experience Really Feels Like
Unless you have received a cosmetic tattoo, you may think the treatment would be cruel or painful. The actual process of permanent eyeliner in Orlando FL, is nowhere near as pain-inducing as many may suspect. Clients can come in all jittery, and during the session, they begin to realize it does not feel like much at all; they feel more like they are experiencing a light scratching sensation. The numbing cream renders the whole ordeal tolerable, and most individuals are amazed that the chair did not hurt as much as they expected.
The post-appointment days are no less important. The pigment appears very strong initially, almost as though you have applied a darker-than-normal eyeliner. It becomes soft and rests down to a natural finish in a week. The short initial pitching time is a way and means of the process and how the pigment balances with your lash line.
The difference in the experience at Strokes of Genius Microblading is care. Neena does not simply put pigment on but explains every step to the client so that he/she know what is going on and can anticipate the next steps. To many women, this counseling makes their trip less about the actual procedure and more about their confidence thereafter.
The Emotional Side of Permanent Eyeliner
This isn’t just about makeup. For many women, it’s about confidence. Some clients have shaky hands and can’t apply eyeliner anymore. Others deal with watery eyes that ruin their makeup daily. Many clients deal with watery eyes, allergies, or contact lenses that make regular eyeliner almost impossible to keep in place.
For them, permanent eyeliner Orlando FL is more than convenience. It’s freedom from stress. It’s waking up, looking in the mirror, and liking what they see without effort. That emotional lift is what keeps women coming back.
Who Benefits the Most
While anyone can enjoy the benefits, certain groups see the biggest change:
- Women with allergies or sensitive skin.
- Contact lens wearers who struggle with smudges.
- Busy professionals with little time for makeup.
- Athletes who sweat through traditional eyeliner.
- Some clients struggle with shaky hands or vision challenges, making eyeliner application difficult. For them, permanent eyeliner is a game-changer.
This treatment adapts to many lifestyles. Whether you want a barely-there lash line or a soft wing, the outcome matches your needs.
Why Orlando Women Love This Choice
Florida’s humidity makes eyeliner one of the hardest makeup products to keep in place. No matter the brand, heat and sweat will eventually break it down. Permanent eyeliner eliminates that frustration.
Local clients often share how much easier their mornings become. Many say it saves them from the daily struggle of uneven lines and smudges. Others love how polished they look even at the beach or gym. It’s makeup that works with Florida living, not against it.
The Final Takeaway
If you’ve had enough of smudging pencils and shaky lines, then it’s time to think about permanent eyeliner Orlando FL. It saves time, avoids irritation, and keeps you looking sharp daily.
At Strokes of Genius Microblading, you get more than just a treatment. You get expertise, care, and results that feel personal. Women across Orlando are already making the switch. Now it’s your turn.
Wake Up Beautiful with Natural Permanent Eyeliner in Orlando
You are not the only one who has ever wished she could have makeup that would not smear, wear off, or need constant touch-up. We hear this daily at Strokes of Genius Microblading from clients who want a long-lasting, clean, natural appearance. This is where natural permanent eyeliner kicks in, an answer created to make doing what you have to less of a hassle and more dramatic or subtle, depending on how you want it.
Our service is tailor-made to fit you as you are a busy professional, a mom who has to do a million chores, has allergies or sensitive eyes, or even hates how difficult eyeliner can be to apply every morning. We do not subscribe to the mass-market beauty. We give you a customizable, detail-oriented finish at Strokes of Genius Microblading, and comfort, safety, and style are never out of style.
What Is Natural Permanent Eyeliner?
Forget the harsh, old-school tattoo eyeliner. Natural permanent eyeliner is a more refined, subtle cosmetic enhancement that gently defines your eyes without the traditional permanent tattoos’ overly bold or dramatic effect. The pigment is delicately implanted into the lash line using advanced cosmetic techniques, not deep tattooing methods.
The result? A soft, barely-there line that enhances your lashes, adds definition to your eyes, and looks effortlessly beautiful even without makeup. It’s perfect for anyone looking to save time, streamline their routine, and still look fresh day and night.
Who Is This For?
Our natural permanent eyeliner service is designed with many clients in mind. At Strokes of Genius Microblading, we serve women and men across Orlando, Kissimmee, Winter Garden, Windermere, Lake Buena Vista, and surrounding areas. We’ve helped many clients from Orlando and surrounding areas who want to:
- Wake up looking refreshed without reaching for the eyeliner pencil
- Say goodbye to makeup smudging due to humidity, workouts, or water
- Avoid irritation caused by conventional makeup products
- Gain confidence after experiencing hair loss or thinning lashes
- Navigate a hectic schedule without compromising on appearance
We understand the unique needs of every client and customize the process to match your lifestyle, eye shape, and desired look.
The Process: What to Expect
Choosing to get natural permanent eyeliner is a big step, and we’re here to guide you through every detail. From your first consultation to your final healed look, we ensure you’re informed, comfortable, and excited.
1. Personalized Consultation
It all begins with a conversation. At Strokes of Genius Microblading, we take the time to understand your goals, skin type, and style preferences. We’ll discuss the thickness, placement, and color that best suit your features and daily lifestyle.
2. Prepping and Numbing
Before we begin, we apply a professional-grade numbing agent to the eyelid area. Your comfort is our top priority. The application is gentle; most clients describe the sensation as minimal pressure or light vibration.
3. The Procedure
Using precise cosmetic tools and vegan, cruelty-free pigments, we implant color along the lash line to create a soft, naturally defined look. The technique ensures the pigment heals into the skin to mimic subtle eyeliner, rather than a solid, stark tattoo.
4. Healing Time
It’s normal to experience mild swelling, redness, and dryness post-procedure. Most of this fades within a couple of days. We provide complete aftercare instructions, including how to manage healing and what to avoid. Your eyeliner will heal to its final look over 4–6 weeks.
Aftercare Tips
Following our aftercare guidance is key to ensuring the best possible outcome. Here’s what we recommend:
- Use a cold compress or ice pack (wrapped in cloth) to reduce swelling
- Avoid water on the treated area for the first 7 days
- Stick to dry healing: no ointments or creams unless directed
- Refrain from touching, rubbing, or picking at the area
- Avoid saunas, pools, and excessive sweating for at least a week
These small steps make a big difference in the final result.
How Long Does It Last?
Natural permanent eyeliner is designed to be long-lasting, but not forever. The pigment stays visible for 12 to 18 months, though this varies depending on your skin type, lifestyle, and aftercare. We recommend annual touch-ups to maintain the look and keep your eyeliner fresh and defined.
This technique fades naturally and evenly, unlike traditional tattoo eyeliner, so you’re never left with unwanted color or shape as time passes.
Why Clients Love It
At Strokes of Genius Microblading, we’ve received heartfelt feedback from clients who love their results. Many clients share how free it feels to skip daily eyeliner routines and still look polished all day. Others appreciate how their eyes look more awake even without a drop of makeup. Many clients appreciate their eyeliner staying intact without smudging or fading, even on busy or humid days.
One thing they all have in common? They wish they’d done it sooner.
Safety First—Always
We are licensed, certified, and committed to the highest hygiene and safety standards. Every pigment we use is vegan and cruelty-free. We never reuse tools or compromise on your health and well-being. Our environment is clean, comfortable, and designed for peace of mind, with a background in shaping beautiful results that align with individual features and goals.
What Makes Our Service Unique?
Many places offer permanent makeup, but here’s why clients choose us:
- Tailored approach: We don’t believe in cookie-cutter results. Every application is custom-designed.
- Gentle technique: We use methods that minimize discomfort and promote natural healing.
- Trusted artist: With over 20 years in Orlando and a certified track record, Neena is someone clients feel safe with.
- Client education: We take the time to explain the process, answer questions, and walk with you every step of the way.
- Results-focused: Our goal is to enhance your features, not change them.
Ready to Simplify Your Beauty Routine?
Imagine waking up, looking in the mirror, and feeling put together. Imagine skipping the eyeliner struggle each morning and never worrying about smudging again. With natural permanent eyeliner, that dream becomes reality.
At Strokes of Genius Microblading, we make it easy to feel confident, polished, and effortlessly beautiful. Book your consultation today and take the first step toward a look you’ll love every single day.
Contact Us
We’re located in the heart of Orlando and serve clients from all surrounding communities, including Kissimmee, Winter Garden, Windermere, and Lake Buena Vista. We’d love to hear from you, whether you’re ready to book or still have a few questions.
Call or text to schedule your consultation. You can also explore our gallery for real before-and-after photos and discover how subtle, natural enhancements can transform your look.
Final Thoughts
There’s something truly powerful about looking in the mirror and seeing a version of yourself that feels effortless and fresh. That’s what natural permanent eyeliner delivers, and we’re proud to bring that to our clients at Strokes of Genius Microblading.
Ready for beautiful eyes that stay with you from morning to night? Your transformation starts here.

Your Guide to Natural-Looking Permanent Eyeliner in Orlando FL
At Strokes of Genius Microblading, we believe that beauty should be effortless. For our clients, that means waking up every morning with eyes that look defined, refreshed, and radiant without ever reaching for an eyeliner pencil. Suppose you’re tired of smudged makeup, reapplying liner throughout the day, or just want a clean, natural look that lasts. That is why our permanent eyeliner in Orlando FL, is straightforward and lasting, made to suit your individuality.
Our specialty is giving you complete, natural-looking permanent eyeliner that fills in your lash line and maximizes what you already have, saving you time, money, and frustration. Whether you’re a busy professional, a mom constantly on the go, someone with allergies or sensitivities, or simply looking for a polished and smudge-proof look, we are here to help you feel your best with a look that stays flawless every day.
Why Choose Permanent Eyeliner?
Imagine never having to redo your eyeliner after a workout, a swim, or a humid Florida day. At Strokes of Genius Microblading, our clients come to us for one simple reason: they want definition without the daily drama. We are skilled in our non-obvious, tidy, and natural-looking Orlando, FL permanent liner. We do not believe in rankish lines or dramatic tendencies that are short-lived. Instead, we make soft, diffused pigment alluding to perfectly apply eyeliner’s appearance, which remains neutral and amazing on your eyes.
We apply the pigment delicately along the lash line, which means you’ll enjoy a naturally enhanced appearance that blends beautifully with your features. It’s perfect for anyone who wants to add depth and definition to their eyes without looking overdone.
Who Benefits Most from Permanent Eyeliner?
While permanent eyeliner is for anyone who wants a long-lasting beauty upgrade, we’ve found that specific clients benefit even more:
- People with allergies or sensitive eyes who can’t tolerate traditional makeup
- Contact lens wearers who struggle with smudging or eye irritation
- People who want a makeup solution that stays put throughout daily activities or weather
- Busy moms and professionals who want to simplify their morning routine
- Clients who prefer not to apply eyeliner daily or struggle with getting the shape just right
Our studio in Orlando, FL, has served countless women who simply want to reclaim their time and feel confident with or without makeup. Whether you’re from Lake Buena Vista, Kissimmee, Winter Garden, or Williamsburg, we’re just a short drive away from giving your eyes the desired enhancement.
Your Eyeliner, Your Way
At Strokes of Genius Microblading, personalization is everything. We don’t believe in one-size-fits-all beauty. When you book your permanent eyeliner in Orlando FL, we’ll begin with a thorough consultation to understand your preferences, lifestyle, and goals. Whether you’re looking for the upper lash line, the lower line, or both, we’ve got you covered.
You’ll get to discuss the style, pigment tone, and shape that best suit your face. From there, we create a custom design that flatters your natural eye shape and adds just the right amount of definition. The result is carefully tailored to your features, preferences, and comfort, so it complements you naturally.
What to Expect from the Process?
We understand that trying something new can raise many questions, especially when it involves a semi-permanent procedure. That’s why we walk you through every step, ensuring you feel comfortable, confident, and cared for.
Here’s what you can expect during your permanent eyeliner in Orlando FL session:
- Consultation: We discuss your expectations and preferences and review your medical history to ensure the treatment is appropriate.
- Numbing: A topical numbing cream is applied to make the process as comfortable as possible.
- Design: We map out the shape and style of your eyeliner based on your eye shape and the look you desire.
- Application: We carefully deposit color along your lash line using precision tools and high-quality pigments.
- Aftercare Guidance: You’ll receive clear instructions on how to heal your skin properly and keep your eyeliner looking fresh.
Clients appreciate how natural and subtle the results look, and they also appreciate the added convenience of skipping eyeliner in their daily routine.
What Makes Strokes of Genius Microblading Different?
We know you have choices when it comes to semi-permanent makeup. That’s why we’ve worked hard to make Strokes of Genius Microblading the go-to destination for permanent eyeliner in Orlando FL. What sets us apart?
- Two Convenient Locations: You can visit us at our studio in Orlando, FL, or our second location in Harpursville, NY.
- Licensed and Experienced Professionals: We pride ourselves on providing high-quality work that meets the highest safety and hygiene standards.
- Natural Results: Our goal is always to enhance your features, not overpower them. You’ll leave looking like the best version of yourself.
- Comfort-Focused Experience: From numbing cream to aftercare support, we prioritize your comfort every step of the way.
- Transparency in Pricing: All our rates are clearly listed, with no surprise fees.
Your Confidence Starts with Your Eyes
Our clients constantly tell us how much time they’ve saved, how confident they feel, and how they can finally skip the eyeliner pencil in the morning. We take pride in helping people like you simplify their routine without sacrificing beauty.
When you choose Strokes of Genius Microblading, you choose expertise, artistry, and an experience that is entirely about you, your look, your comfort, and your results.
Ready to Make the Switch?
If you’ve been considering permanent eyeliner in Orlando FL, there’s no better time to leap. Whether you want to shave minutes off your routine, stop worrying about smudges, or just feel more put together daily, we’re here to help make it happen.
Booking is simple, and Payment options include Venmo and CashApp as listed on our website for your convenience. Plus, if you’re a first-time client, don’t miss your chance to receive $25 off by signing up on our homepage. It’s our way of saying welcome to the Strokes of Genius Microblading family.
Let’s Get Started
We invite you to explore the possibilities and rediscover your eyes in a new way. With permanent eyeliner in Orlando FL, you can enjoy effortless beauty that lasts. No more smudges. No more stress. Just eyes that always look defined, vibrant, and naturally you.
Post-Microblading Advice: Everything You Need to Know
Microblading is an excellent method to achieve full, natural brows. The treatment deposits pigment into the skin, appearing as hair strokes. This provides your brows with more shape and fullness. However, the job is not completed when you leave the salon. Care is important for healing and maintaining your brows in good condition for months ahead. If you are a client at Strokes of Genius Microblading or are considering getting it done, this guide will provide you with post-microblading advice to achieve the best results.
What Happens After Your Microblading Session?
After your appointment, you may notice a few changes in your brows. It is expected that there will be dark pigment immediately after the treatment. Don’t panic; this will disappear within a few days. You may also notice a little redness and swelling, but that should disappear after a few hours.
Your skin will begin to heal, and your brows will flake away slightly with it. This is also okay, allowing the skin to peel off dead cells. You may feel your brows appear lighter when flakes fall off, but don’t worry. The color is still there; when the skin heals completely, the color will be more natural.
Post-Microblading Advice: What to Avoid in the First 7-10 Days
During the first week or so, the most crucial aspect of your aftercare is keeping your brows clean and dry. At Strokes of Genius Microblading, we recommend avoiding certain things to keep your brows fresh and make the pigment last.
- Sweating: Avoid the things that get you sweaty, such as heavy exercise or heated saunas. Sweat interferes with the healing and brings color out before time.
- Swimming: Swimming in pools irritates your skin and disrupts the color. Avoid going to the swimming pools for a minimum of 7-10 days.
- The Sun: UV rays can cause the pigment to fade quickly. Avoid the sun, and don’t use tanning beds. If you must be outside, wear a hat to cover your brows.
- Facial Treatments: Steer clear of chemical peels, laser skin treatments, or harsh skincare products such as Retin-A or Glycolic Acid, as they can hurt your healing skin.
- Picking or Scratching: It may itch or flake when your skin heals. Don’t pick at it, though! Scratching or peeling the skin will result in scarring or eliminate the pigment, resulting in uneven brows.
- Makeup on Your Brows: Avoid applying makeup to your brows while healing. Makeup irritates or introduces bacteria that may result in infection.
Caring for your brows during these initial days will keep them looking wonderful.
What to Do During the Healing Process?
While there are plenty of things you should avoid, there are also things you can do to ensure the healing process is a smooth one:
- Keep Your Brows Clean: Wash your brows gently with a soft, non-alcoholic cleanser. Use a cotton pad, and don’t rub them too hard. Dry them to assist the skin in healing.
- At Strokes of Genius Microblading, clients are instructed to take a dry healing process following saline tattoo removal.
- Hands Off: Avoid touching your brows except for when you clean them. Unclean hands transfer bacteria and bacteria can create infection.
- Adhere to the Aftercare Instructions: Make sure to follow the care provided by your technician. Adhering to the plan is important for satisfactory results.
Why You May Need a Touch-Up?
If this is your first time getting microblading, you’ll likely need a touch-up after about 6 weeks. This is because not all pigment will stay in place during the healing process, and some parts of the brow may need more work. A touch-up session will ensure that your brows look their best, giving the technician a chance to add any strokes or shapes that may have faded.
We at Strokes of Genius Microblading suggest a touch-up afterward to achieve your ideal brows and extend their life. After the touch-up, your brows will last for approximately a year before requiring a refresh.
What to Expect After Healing?
Once your brows are fully healed, you’ll see how the pigment has settled and how your brows look. They should have a soft, natural look that fits your face. By now, any redness or swelling will be gone, and the flakes will have shed. The color of the pigment will have softened and become more like natural hair strokes.
Following the healing period, you are good to resume normal activity and can even use makeup on your eyebrows if you would like. A brow pencil or powder can be used on top of the work if additional accentuating is needed. The objective of microblading is, however, to have attractive-looking eyebrows requiring no makeup application every day.
Final Thoughts
Aftercare following your microblading appointment is the secret to ensuring your brows heal properly and last as long as possible. By keeping the post-microblading advice mentioned above in mind, you’ll be well on your way to having gorgeous, natural-looking brows. Whether you’re a new client or have already had microblading at Strokes of Genius Microblading, brow care will ensure your brows look their best.
Remember, healing takes time, and the process can vary from person to person. But by avoiding common mistakes and sticking to your aftercare routine, you’ll give your brows the best chance to look amazing for months.

Top Dos and Don’ts for Microblading Care in Orlando
Microblading is one of the best ways to get full, well-shaped brows without makeup. However, proper care is key after the procedure to ensure your results last and look their best. If you’ve just had microblading done or are thinking about it, following the right steps will make all the difference. Strokes of Genius Microblading helps clients in Orlando get the most out of their microblading. This blog will discuss the best dos and don’ts for microblading care Orlando.
Why Microblading Care Matters?
Microblading is a procedure where very small strokes of color are deposited into the skin to resemble the appearance of real hair. As with any treatment, aftercare is necessary. This allows the skin to heal well and keep the shape clean and crisp. In Orlando, the weather can be very hot and humid, softening skin. So, brow maintenance is crucial to achieve the optimal result.
In this blog, we will provide instructions on maintaining your brows after your microblading process to ensure they are in perfect condition.
The Dos of Microblading Care in Orlando
- Maintain Clean and Dry Brows
Immediately after treatment, the skin surrounding your brows must remain clean and dry. For the initial 10 days, do not wet your brows. When cleaning your face, use a damp cotton pad to wipe across the brow region softly. Do not splash water onto your brows or have them sit in a shower. This assists the pigment to heal nicely.
- Dry Healing is Strongly Recommended
Strokes of Genius Microblading strongly recommends dry healing as the optimum aftercare technique after saline tattoo removal. They tell clients not to put ointments, creams, or oils on the treated area. Rather, the scab should be kept dry and intact during the healing process. This is important since the saline solution attracts pigment to the surface, and the natural creation and subsequent peeling off of the scab permit the pigment to be brought up and forced out of the skin.
- Adhere to the Healing Plan
Your brows will heal in the next two weeks. At that time, you might notice little scabs developing. It’s okay for the skin to peel off. Just let the skin naturally shed off. Picking at scabs can sabotage your results and lead to scarring. Letting the skin heal naturally is the way to go so you have the most beautiful look.
- Protect Your Brows from the Sun
The sun can also bleach out your brow pigment and burn your skin. Keep your brows out of direct sunlight when the sun can be harsh in Orlando. If you need to go outside, wear a hat or apply physical sunscreen after a few weeks. This will preserve your brows and ensure that the pigment will last longer.
- Don’t Sweat Too Much
Sweating irritates the skin and delays healing. If you exercise or engage in activities that cause you to sweat, avoid them for the first two weeks. Sweat also contains dirt and bacteria, which may cause infection. In Orlando, where heat makes you sweat more, keeping your brows dry and clean is even more crucial.
- Get Touch-Ups
You might require a touch-up after your initial microblading session in around 6 weeks. During healing, your skin will soak up some of the pigment, and a touch-up will ensure the brows are crisp and even. Strokes of Genius Microblading provide touch-up sessions to refine the shape and color of your brows so they appear their best.
The Don’ts of Microblading Care in Orlando
- Don’t Pick or Scratch Scabs
During the time your brows heal, tiny scabs can be formed. Despite how much it might itch to pick or scratch them, refrain from doing this. Picking will make your pigment shed off or leave it scarred. If your brows itch, treat them with aftercare balm to soothe the area. Allow the scabs to flake off on their own to keep the area safe and clean.
- Don’t Let Water Soak Your Brows
Water may soften the scabs and draw the pigment out of your skin. During the first week following your procedure, attempt to keep your brows dry. Refrain from swimming, hot tubs, or prolonged showers that might soak the area. If you must wash your face, gently wipe it, and do not get water on your brows.
- Don’t Use Harsh Products
On the healing stage, avoid using severe products such as exfoliants, retinol, or products containing alcohol. These types of products might irritate your skin and inhibit healing. Avoid using any powerful chemicals on the affected area as well.
- Don’t Sleep on Your Face
While your brows heal, don’t sleep on your face. The pressure of sleeping on your brows can warp the shape and impair healing. In the first week, sleep on your back so your brows don’t get pushed into the pillow.
Conclusion
Post-microblading care of your brows is the most important way to achieve optimal results. By adhering to these microblading care Orlando dos and don’ts, you can heal your brows correctly and make them last as long as possible. If you have questions or need assistance, the Strokes of Genius Microblading staff is always available. From aftercare tips to touch-up appointments, we’re dedicated to providing you with the ultimate brow experience in Orlando. Simply follow these steps, and you’ll have perfect brows for months!